Your First Mod
In this guide, you'll create a simple "Hello World" BepInEx plugin for ULTRAKILL.
Make sure you've completed the Installation & Setup guide before continuing. You'll need BepInEx installed and JetBrains Rider ready.
Creating the Project
- Open JetBrains Rider and click New Solution
- Select Class Library from the project types
- Configure your project:
- Set the Solution name to something like
MyFirstMod - Set the Target Framework to
netstandard2.1(this is what ULTRAKILL uses)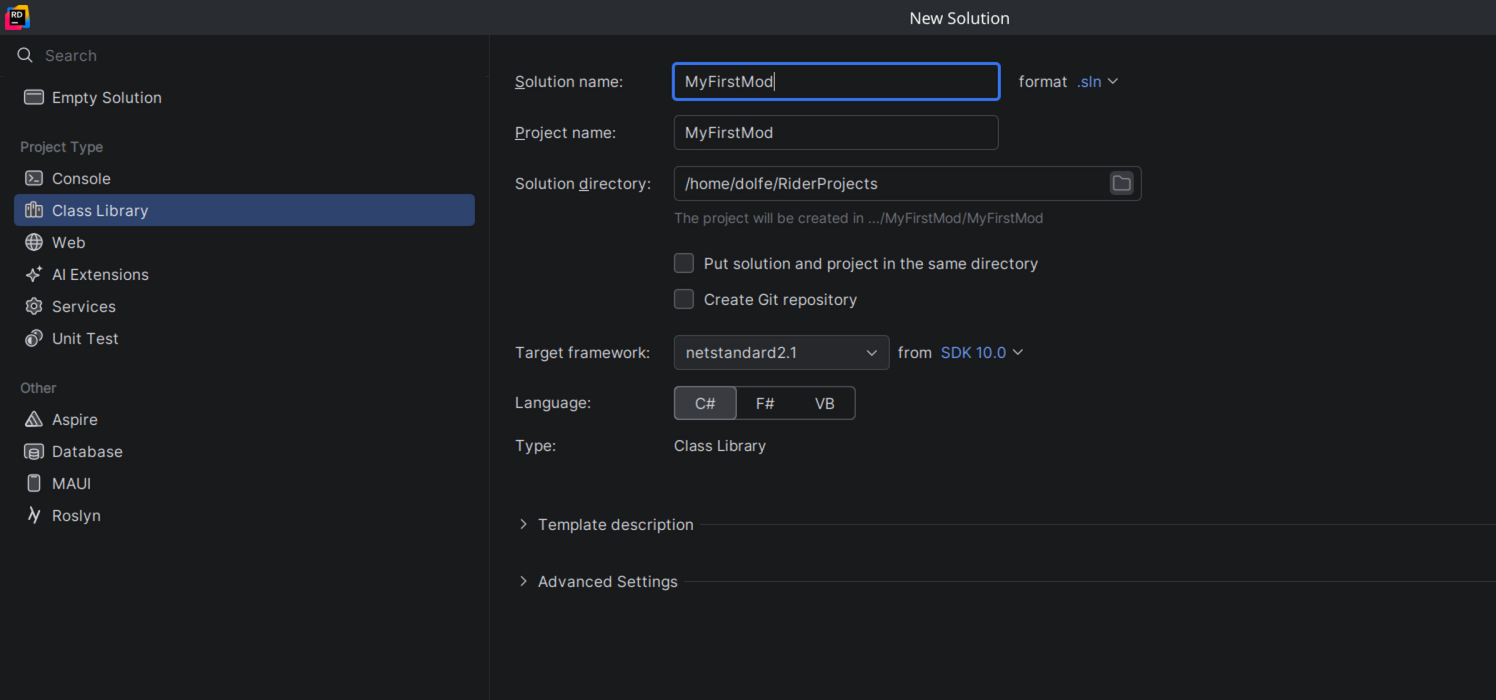
- Set the Solution name to something like
- Click Create
The UI Explained
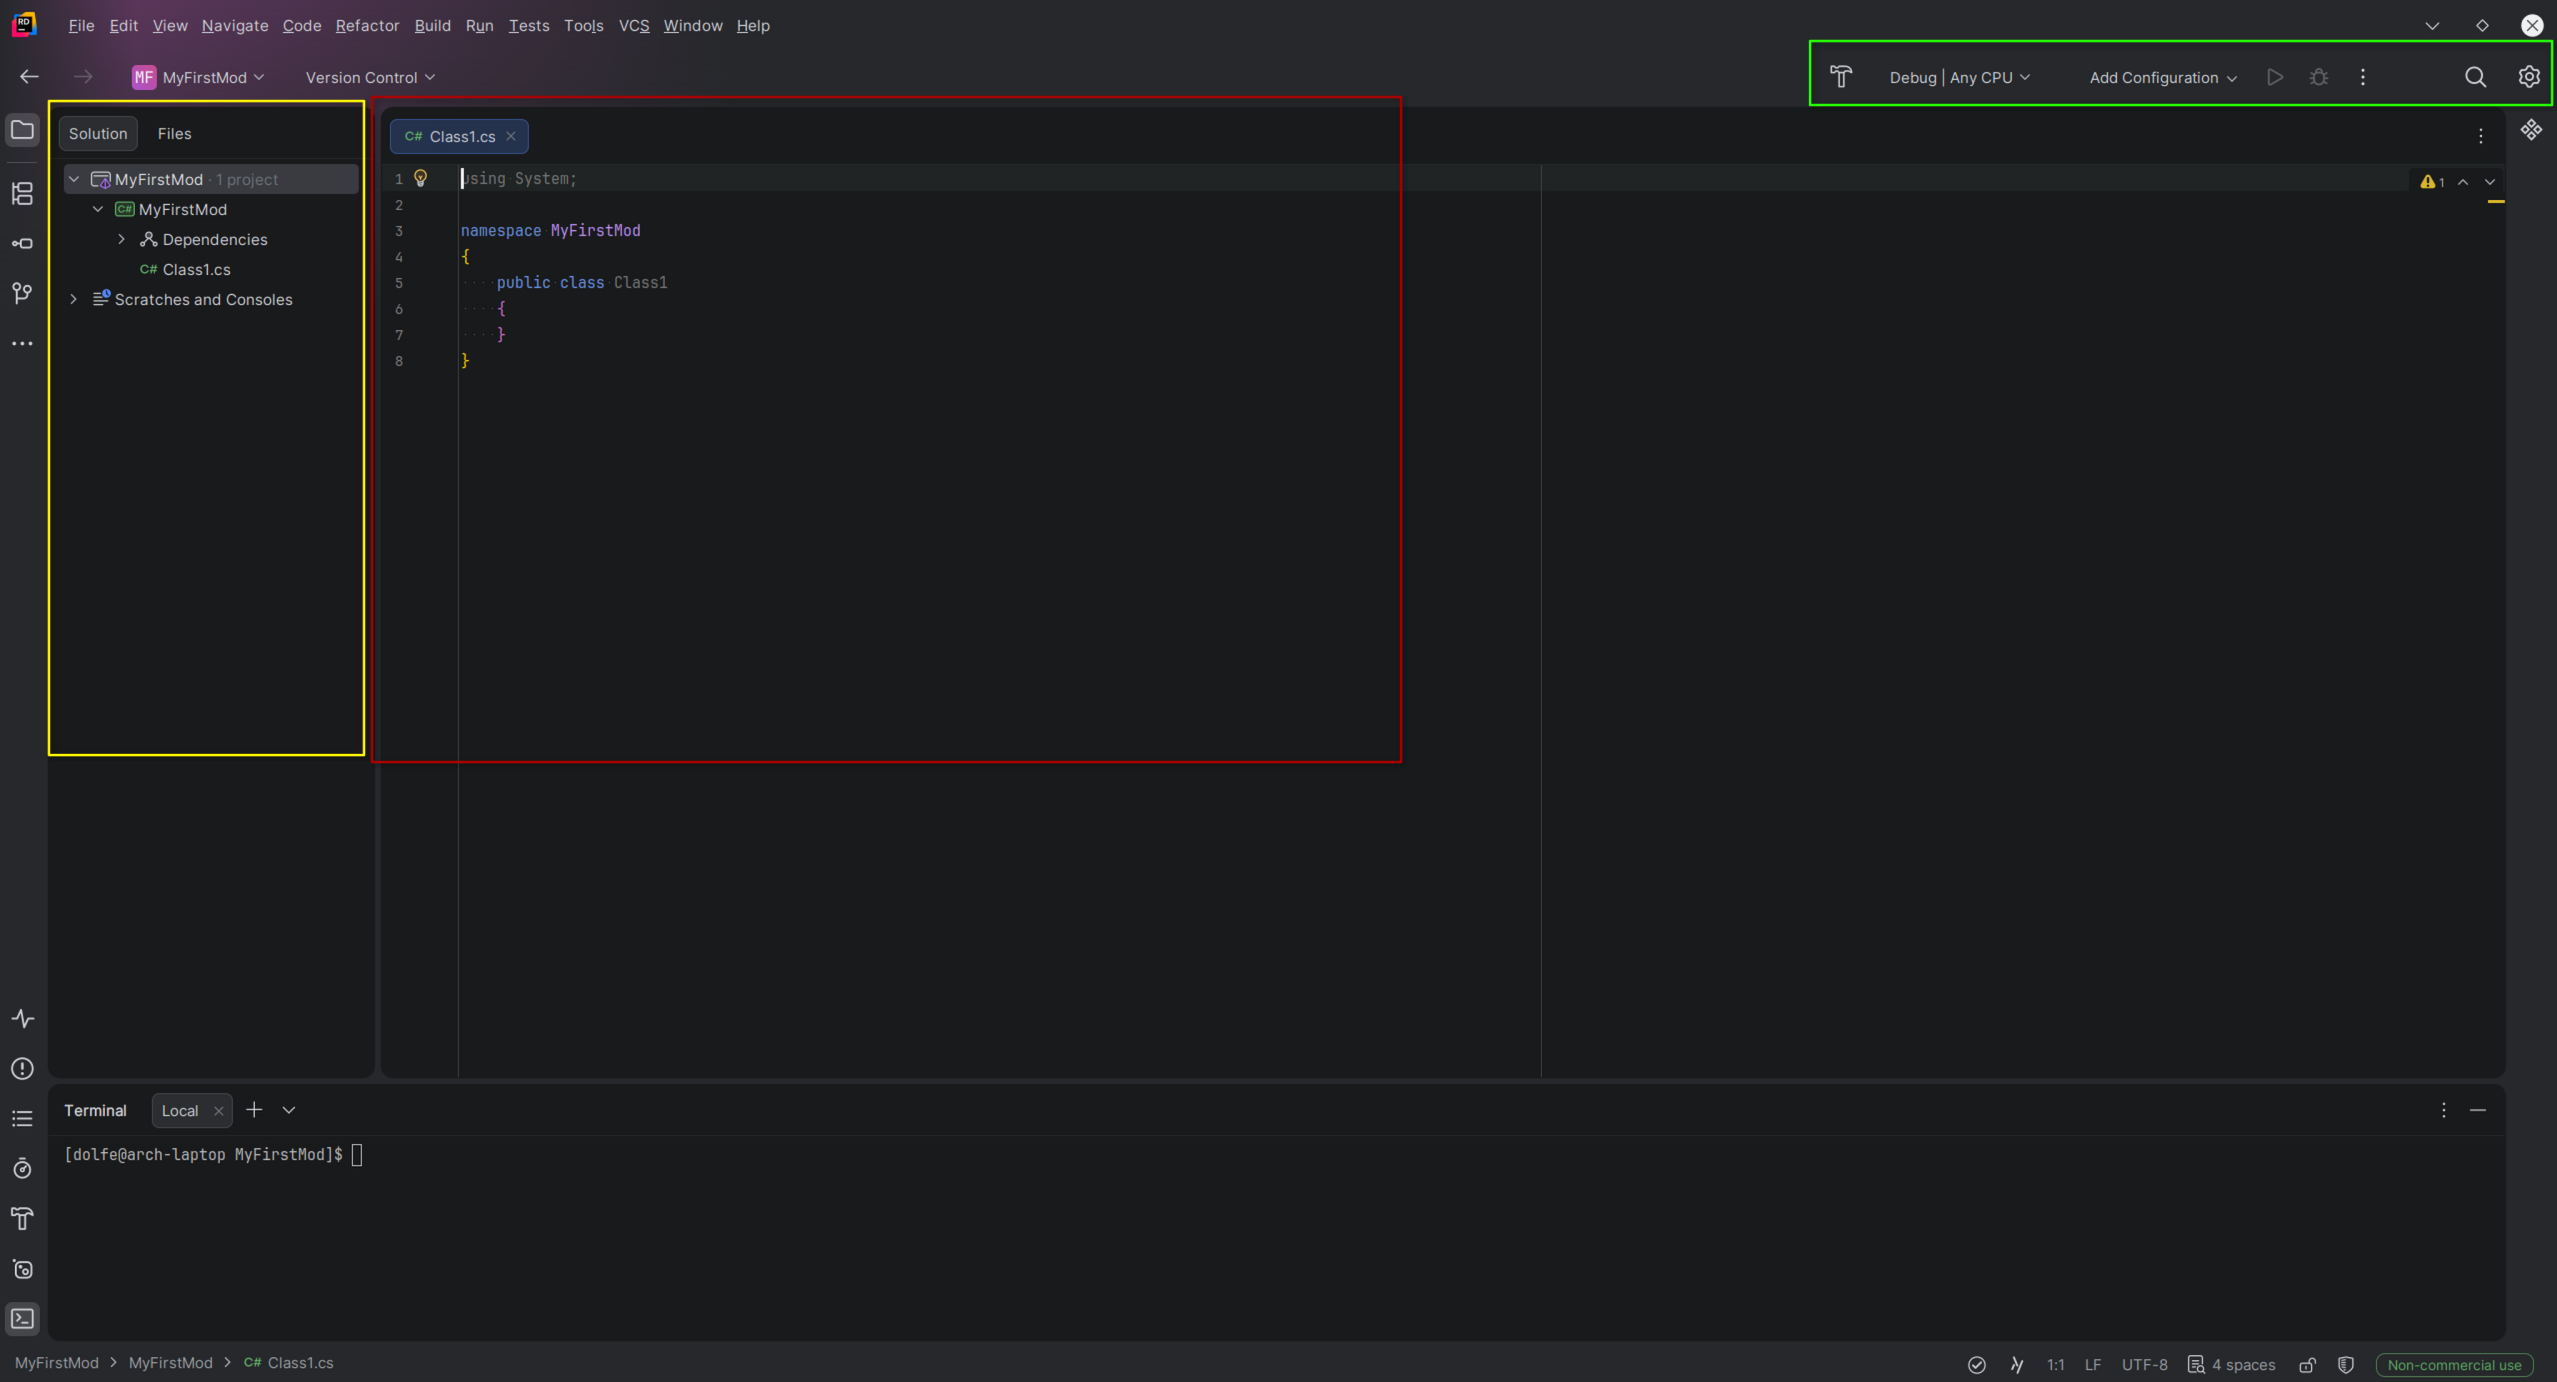 In this screenshot these 3 highlighted areas are the most important currently
- In the Red box is the Code editor
- In the Yellow box is the Explorer
- In the Green box is Building and settings
The code editor
This is where you'll spend most of your time. When you open or create a file it will appear here as a tab.
Rider helps you write code with:
- Autocomplete press
Ctrl+Spaceto suggest completions as you type - Error highlighting red underlines mean something is wrong, hover over them to see why
- Quick fixes click the lightbulb (or press
Alt+Enter) on a highlighted issue to see fix suggestions - Go to definition
Ctrl+Clickany class or method to jump to where it's defined
If the editor looks overwhelming, don't worry, you only need to focus on the file that's open. Everything else is just there when you need it.
The Explorer
The Explorer shows all the files and folders in your project. You'll use it to navigate between your .cs files and open new ones.
- Single-click a file to preview it, double-click to open it properly in the editor
- Right-click a file or folder to get options like rename, delete, or add a new file
If you can't see the Explorer, press Alt+1 to open it.
The Builder
The Builder is how you compile your mod into a .dll file that ULTRAKILL can load.
- Build Click the hammer icon to compile your project
- Errors If something is wrong with your code, they'll appear here with a description and a link to the exact line
- Output path Your compiled
.dllwill be placed inbin/Debug/netstandard2.1/inside your project folder, this is the file you copy intoBepInEx/plugins/
Always check the Builder output after compiling a successful build shows Build succeeded with 0 errors. If there are errors, fix them before copying the .dll to your plugins folder, otherwise the old version of your mod will still be running.
Adding References
Your mod needs to reference BepInEx and ULTRAKILL's assemblies so you can code
- Right-click Dependencies in the Solution Explorer > Reference...
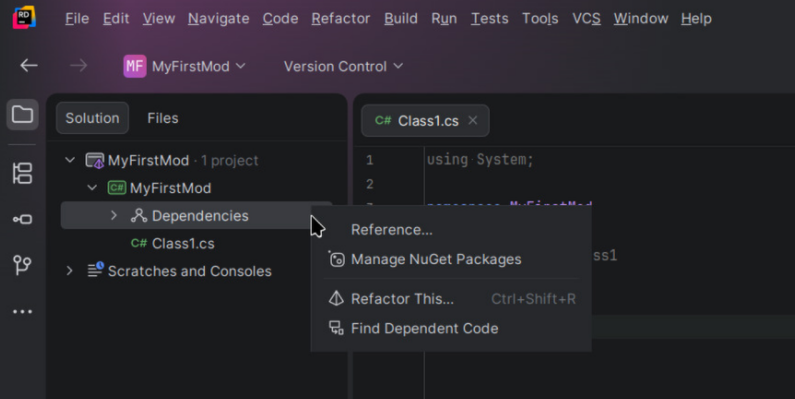
- Referencing the
.dllfiles- In the opened menu, Click Add From...
- Go to your ULTRAKILL dir
- First add the BepInEx dlls
- In the ULTRAKILl dir, Open BepInEx, then core
- Hold CTRL then click
BepInEx.dlland0Harmony.dll - Press Ok
- Reopen the menu
- Now adding the ULTRAKILL dlls
- In the ULTRAKILL dir, Open ULTRAKILL_Data, then Managed
- Hold CTRL then click:
Assembly-CSharp.dll(Ultrakill's code)UnityEngine.dll(Unity's code)UnityEngine.CoreModule.dll(Unity's core code)UnityEngine.InputLegacyModule.dll(For basic input for this tutorial)- Finally press Ok
Writing the Plugin
Every BepInEx plugin needs two things: a [BepInPlugin] attribute and a class that extends BaseUnityPlugin. Rename the default Class1.cs file to Plugin.cs, then write the following:
using BepInEx;
using BepInEx.Logging;
using UnityEngine;

namespace MyFirstMod
{
    [BepInPlugin("yourname.ultrakill.tutorialmod", "Tutorial Mod", "1.0.0")]
    public class Plugin : BaseUnityPlugin
    {
        internal static ManualLogSource Log;

        private void Awake()
        {
            Log = Logger;
            Log.LogInfo("Hello world!");
        }
    }
}
Plugin Explained
The three strings in [BepInPlugin] are:
- GUID A unique ID for your mod, convention is
yourname.gamename.modname. This should be unique, if two mods share the same GUID BepInEx will refuse to load one of them - Name The display name of your mod, this is what shows up in the BepInEx console and log file
- Version Follows
major.minor.patchformat
The class
public class Plugin : BaseUnityPlugin
The : BaseUnityPlugin part means your class inherits from BepInEx's BaseUnityPlugin. Without this, BepInEx won't recognize it as a plugin at all.
The logger
internal static ManualLogSource Log;
This declares a Log variable that the whole class can use. Making it static means other classes in your mod can access it too via Plugin.Log.
Awake
private void Awake()
{
    Log = Logger;
    Logger.LogInfo("Hello world!");
}
Awake() is a Unity method that runs once when your mod is first loaded, before the game's main menu appears. This is where you set things up registering patches, loading config, assets and so on. You'll be putting a lot of code here as your mods get more complex.
Awake() is not the only Unity method available to you. Update() runs every frame, and Start() runs once after Awake(). You'll use these later when you need to do things continuously.
Basic Logging
BepInEx provides a built-in logger you can use to print messages to the console and log file. There are a few log levels depending on what you want to communicate:
Logger.LogInfo("Everything is working fine"); // general info
Logger.LogWarning("Something might be wrong"); // non fatal issues
Logger.LogError("Something went wrong"); // errors
Log messages show up in the BepInEx console window that opens alongside the game, and are also written to BepInEx/LogOutput.log if you need to check them after closing the game.
Compiling and Testing
- Build the project — In Rider, Press the hammer (In the Green Box Shown here). If there are no errors, your
.dllwill be output tobin/Debug/netstandard2.1/MyFirstMod.dllinside your project folder. - Copy the
.dll— Navigate to your ULTRAKILL installation folder, go intoBepInEx/plugins/, and pasteMyFirstMod.dllthere. Launch ULTRAKILL, get to the main menu, then close if it doesn't exist. - Launch ULTRAKILL — Start the game normally via Steam.
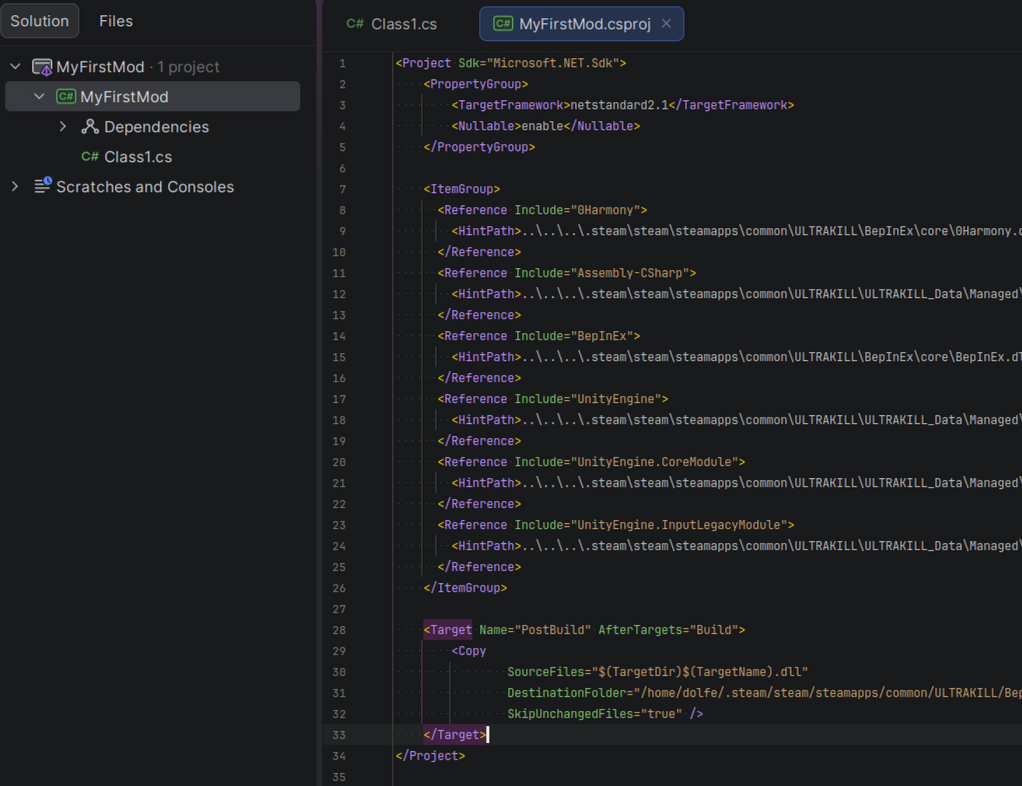
To speed up testing, you can set make Rider copy the dll automatically This is a snippet you can add to your .csproj to make that happen:
<Project Sdk="Microsoft.NET.Sdk">
    <PropertyGroup>
        ...
    </PropertyGroup>

    <ItemGroup>
        ...
    </ItemGroup>

    <!-- Add this and replace `~YOUR ULTRAKILL PATH~` with your ULTRAKILL path: -->
    <Target Name="PostBuild" AfterTargets="Build">
        <Copy
            SourceFiles="$(TargetDir)$(TargetName).dll"
            DestinationFolder="~YOUR ULTRAKILL PATH~/ULTRAKILL/BepInEx/plugins/"
            SkipUnchangedFiles="true" />
    </Target>
</Project>
If you want to do this, open your csproj for editing:
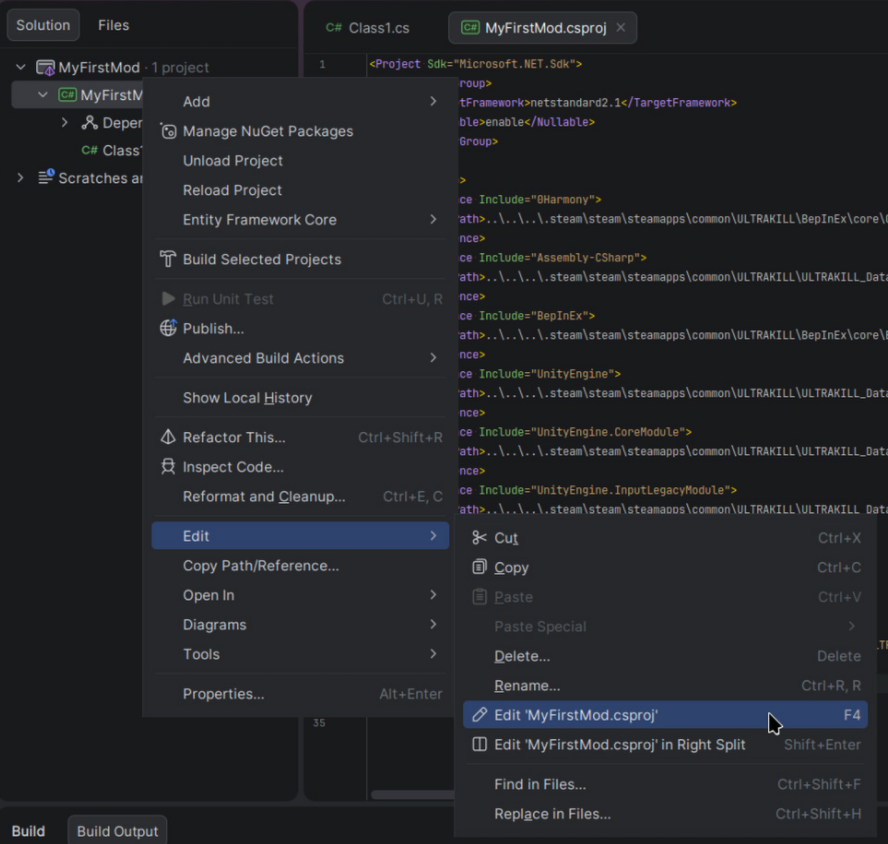 And make the edit, it should look like:
Seeing Your Mod Work In-Game
When ULTRAKILL launches, the BepInEx console window will open alongside it. Look for your message in the output:
[Info   :   BepInEx] Loading [Tutorial Mod 1.0.0]
[Info   :Tutorial Mod] Hello world!
If you see that line, your mod is working!
If you don't see your log message, double-check that:
- Your
.dllis inBepInEx/plugins/ - The BepInEx console is enabled in
BepInEx/config/BepInEx.cfg(see the Setup guide) - There are no build errors in Rider